Before you learn to turn, you must be able to stop. The snowplow — also called “pizza” — makes a wedge with your skis so their edges scrape the snow and slow you down. It's the foundation for everything that follows. Once you can stop reliably, you relax, and a relaxed skier learns everything else much faster.
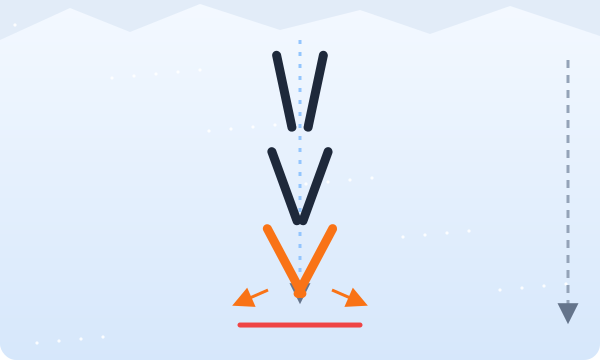
Why the snowplow works
When your skis point straight down the hill and lie flat, there is almost nothing to slow you down. In a wedge, each ski is angled across your direction of travel and tilted slightly onto its inside edge. The edges scrape against the snow and create friction. The wider the wedge and the more you tilt onto the inside edges, the more friction you create — and the slower you go.
Body position
- Feet about hip-width apart, ankles and knees slightly bent
- Weight centered over the middle of your feet — shins gently pressing the front of your boots
- Hands forward, as if holding a tray, eyes looking ahead, not at your skis
- Ski tips close together but not crossing; tails pushed apart
Practice on flat ground first
Before you slide anywhere, stand on flat snow and get to know the movement. Push both heels out so the tails separate and the tips stay close, then let the skis come back parallel. Do this ten times. Then try making the wedge small, medium and wide. Feel how your knees move slightly inward and your weight presses on the inside edges as the wedge gets wider.
Step by step
- On flat ground, practice pushing your heels out to form a wedge, then bringing the skis back parallel
- On the gentlest slope or magic carpet, start sliding straight down in a small wedge
- To slow down, push your heels further out and press both inner edges evenly
- To stop completely, keep widening the wedge until you come to a halt
- Repeat: small wedge (glide) → large wedge (slow) → stop
Drills to build control
- Red light, green light: a friend or instructor calls “go” and “stop”, and you react immediately
- Stop at a target: choose a pole or marker and try to stop right beside it
- Wedge accordion: glide with a small wedge, widen it, narrow it again — without stopping
- Count your stops: on one run, try to stop five times at different points
Common mistakes
- Leaning back: your skis speed up — move your hips forward over your feet
- Crossing the tips: keep a small gap (about a fist) between them
- Locking your knees: stay soft and flexed so you can control the edges
- Looking down at your skis: look 5–10 meters ahead
How to know you're ready to move on
- You can stop whenever you choose on the beginner slope, not only at the bottom
- You can glide slowly in a small wedge without the skis crossing
- You can stop without your legs feeling exhausted after a few runs
- You feel calm, not tense, when you start sliding
Your thighs will probably feel tired at first, because beginners often push too hard. As you improve, you'll find you need less force: a slightly wider wedge and a little more edge are enough. If your legs burn after every run, try a smaller wedge and let the edges do more of the work.