Until now you've stayed on one edge. A real turn means switching edges: heel to toe, or toe to heel. To do that, the board has to point straight downhill for a moment — which feels scary at first, but only lasts a second. Once you've done it a few times, you'll realize that moment is where turns begin, not something to fear.
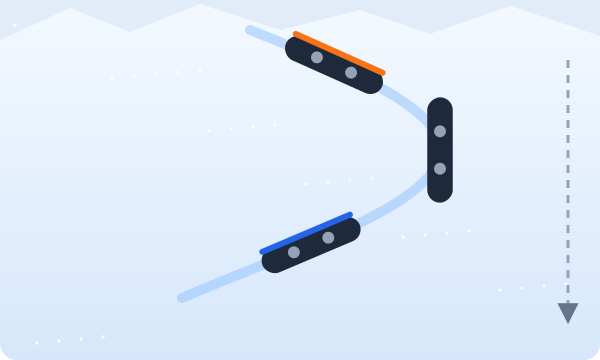
Why the board must point downhill
To move from one edge to the other, the board has to pass through a moment where it is flat on the snow. If that happens while the board is across the slope, the downhill edge can catch, which leads to a hard fall. When the board points down the fall line, flattening it is safe, because neither edge is facing downhill. That is why every edge change happens as the nose points downhill.
Start with J-turns
Before the full edge change, practice J-turns. From a falling leaf, let the nose drift toward the fall line for a moment, then steer back onto the same edge and slow down. Your track looks like the letter J. Gradually let the board point downhill a little longer each time. This builds confidence with the speed you'll feel during a real turn.
Heel-to-toe turn, step by step
- Start in a falling leaf on your heel edge, traveling toward your front foot
- Gently press your front foot to let the nose turn toward the fall line
- As the board points downhill, flatten it briefly and keep your weight over the front foot
- Roll your weight onto your toes and press your front knee forward — the toe edge engages
- Let the board come across the slope and slow down on your toe edge
Toe-to-heel turn
Do the same in reverse: from a toe-side falling leaf, let the nose drop toward the fall line, flatten, then sit slightly back onto your heels to engage the heel edge.
Many people find this direction harder at first, because it feels like sitting back. Keep your weight over your front foot as the board points downhill, and only then shift onto your heels by bending your knees, as if sitting on a high stool. Don't drop your hips behind the board.
Common mistakes
- Leaning back when the board points downhill: this makes the turn fail — stay over your front foot
- Rushing the edge change: wait until the board is pointing downhill before rolling over
- Twisting with the shoulders only: turn your head and hips, and let the board follow
Choosing the right slope
Practice on a wide, very gentle slope with a flat area at the bottom. You want just enough speed to complete the turn, but not so much that the moment pointing downhill feels frightening. A slope that seemed boring during the side slip is often perfect for your first edge changes.
If you keep falling
- Falling toward the downhill side mid-turn usually means you changed edges before the board pointed downhill
- Falling backward usually means your weight moved onto the back foot — press the front foot more
- If the board won't turn, look further in the direction of the turn and rotate your hips with your head
- Take a break if you're tired; edge changes require focus, and fatigue leads to more falls